10. leht 23-st
Saab 9-5 Estate 2.3t -->3.0t, 1999, overspeed
Postitatud: N Nov 07, 2013 13:57
Postitas overspeed
.
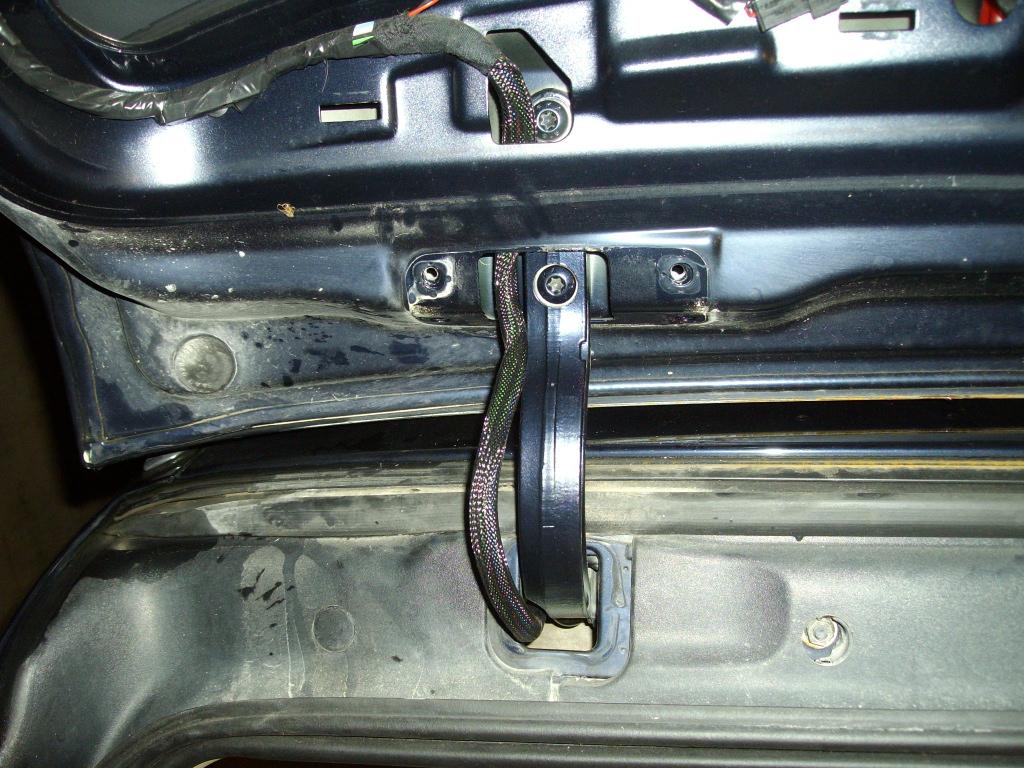
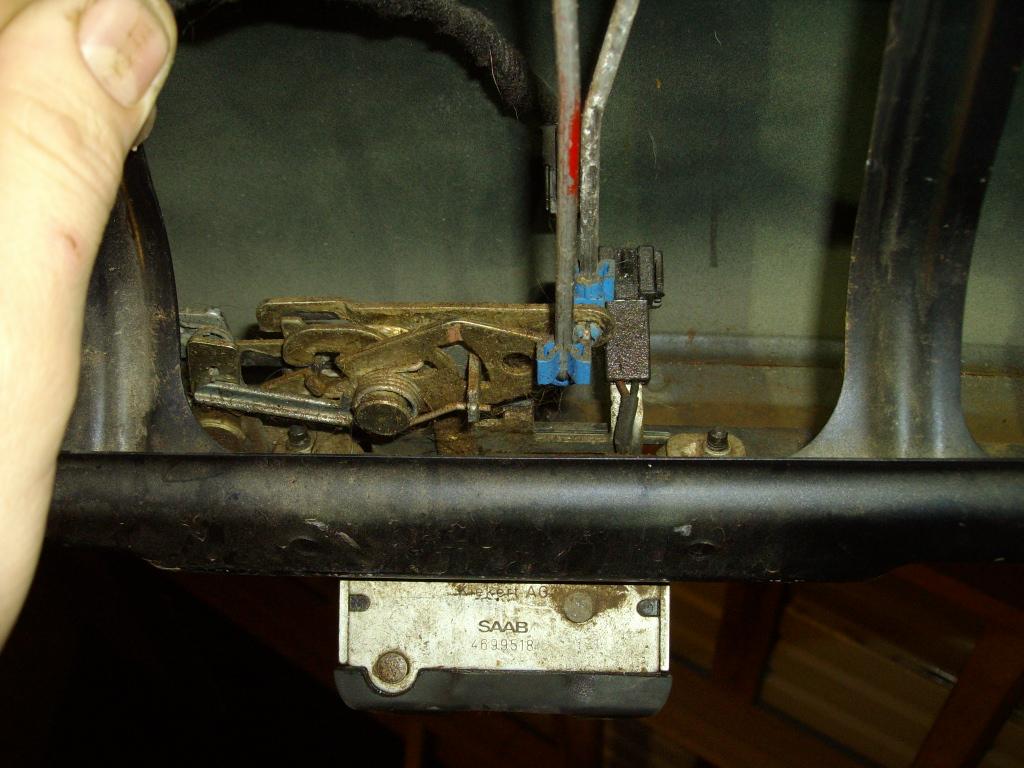
Sai siis uuritud seda tagaluugi anduri probleemi. Polstrid maha:
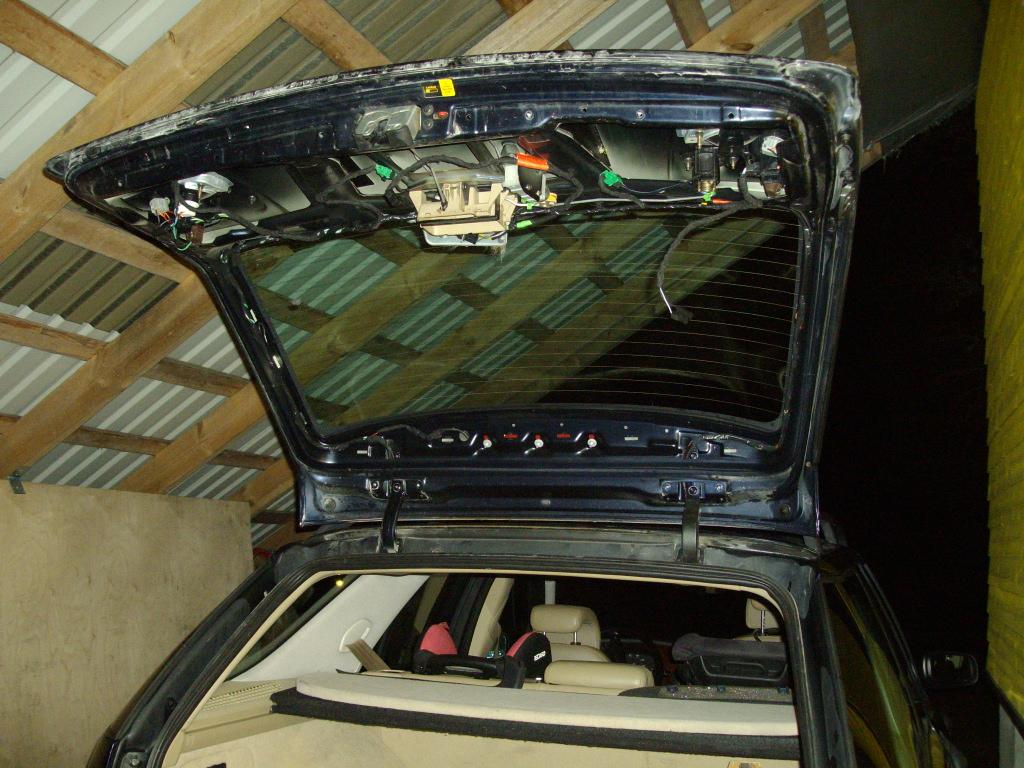
- tagaluuk1.JPG (132.77 KiB) Vaadatud 5480 korda
- tagaluuk2.JPG (101.46 KiB) Vaadatud 5480 korda
- tagaluuk3.JPG (86.79 KiB) Vaadatud 5480 korda
Saab 9-5 Estate 2.3t -->3.0t, 1999, overspeed
Postitatud: N Nov 07, 2013 14:01
Postitas overspeed
.
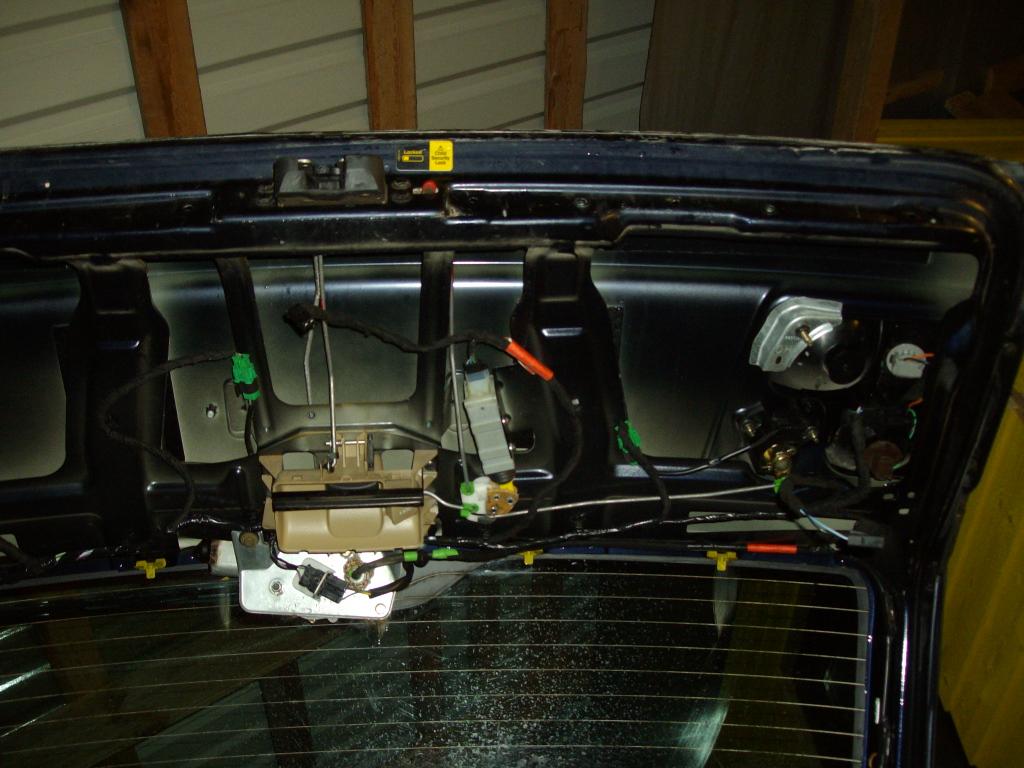
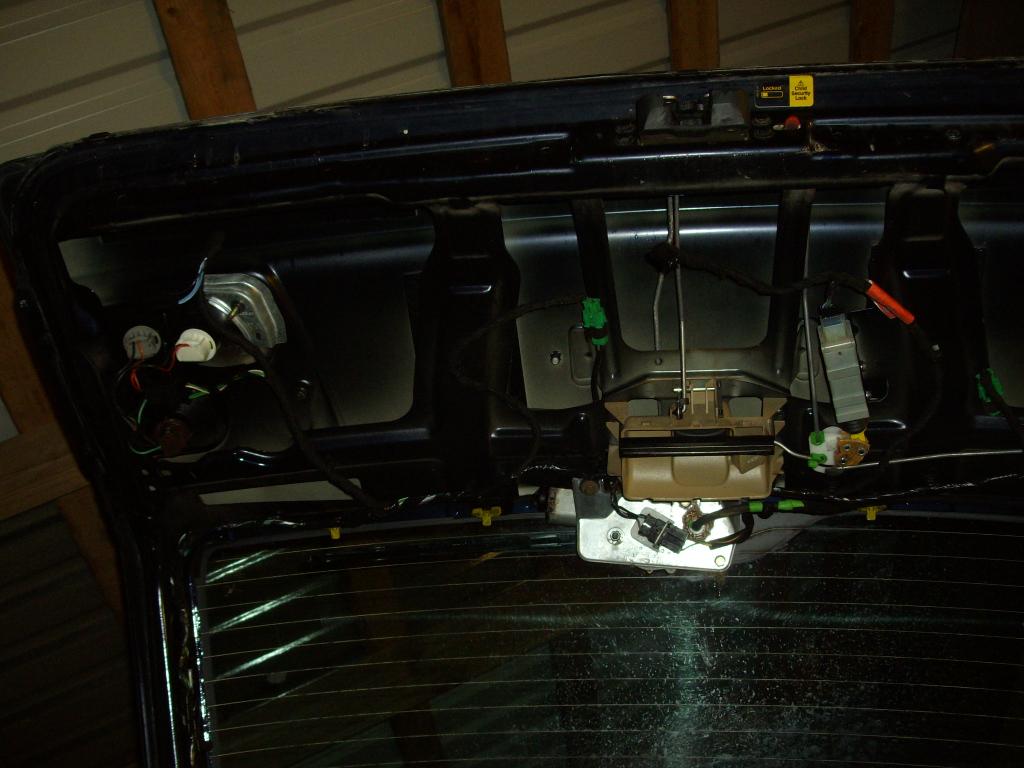
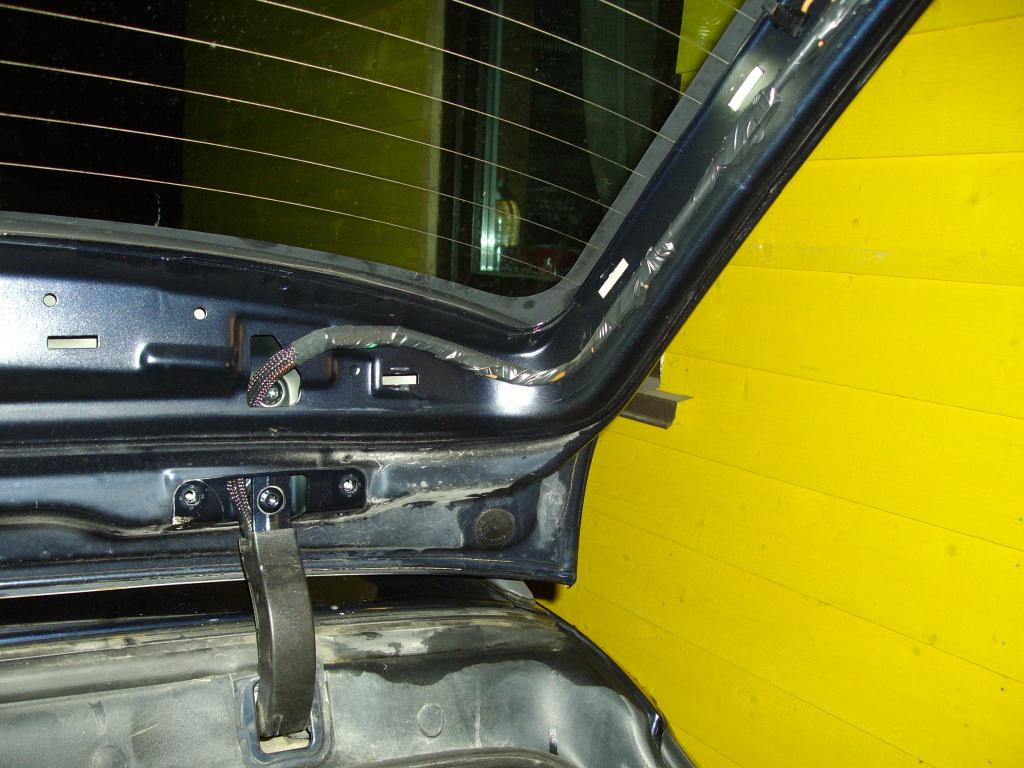
Kui juhtmetes probleem olla, siis need asuvad vasema inge sees:
- 04-luukingvasem1.JPG (102.51 KiB) Vaadatud 5480 korda
- 05-luukingvasem2.JPG (144.42 KiB) Vaadatud 5480 korda
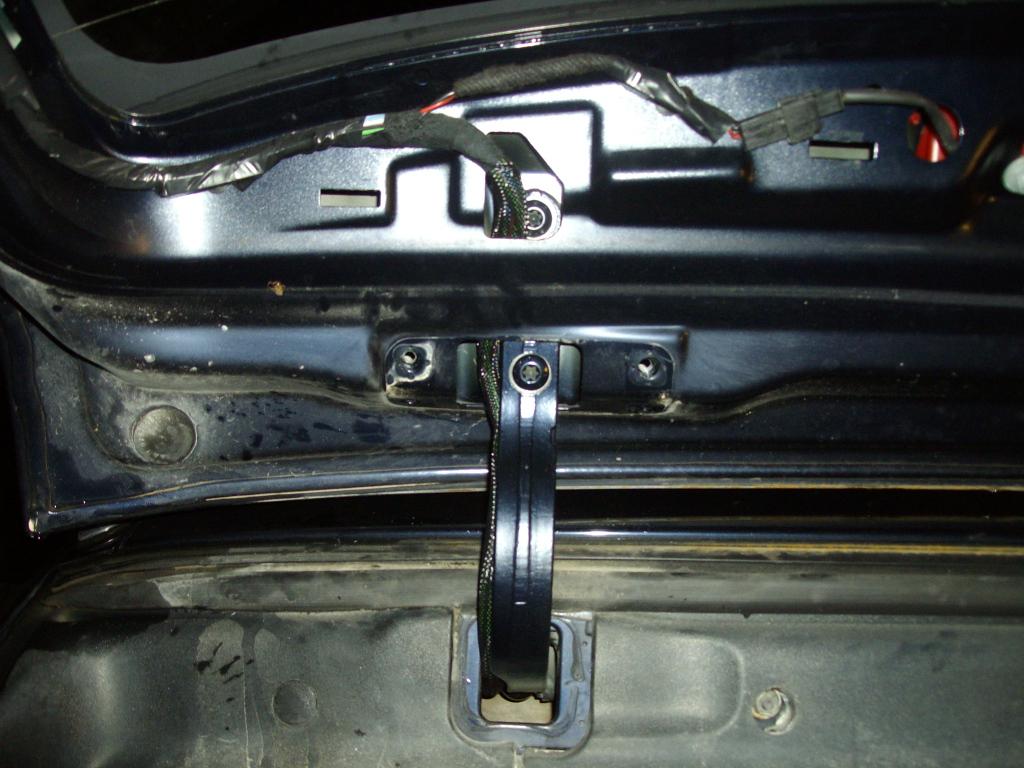
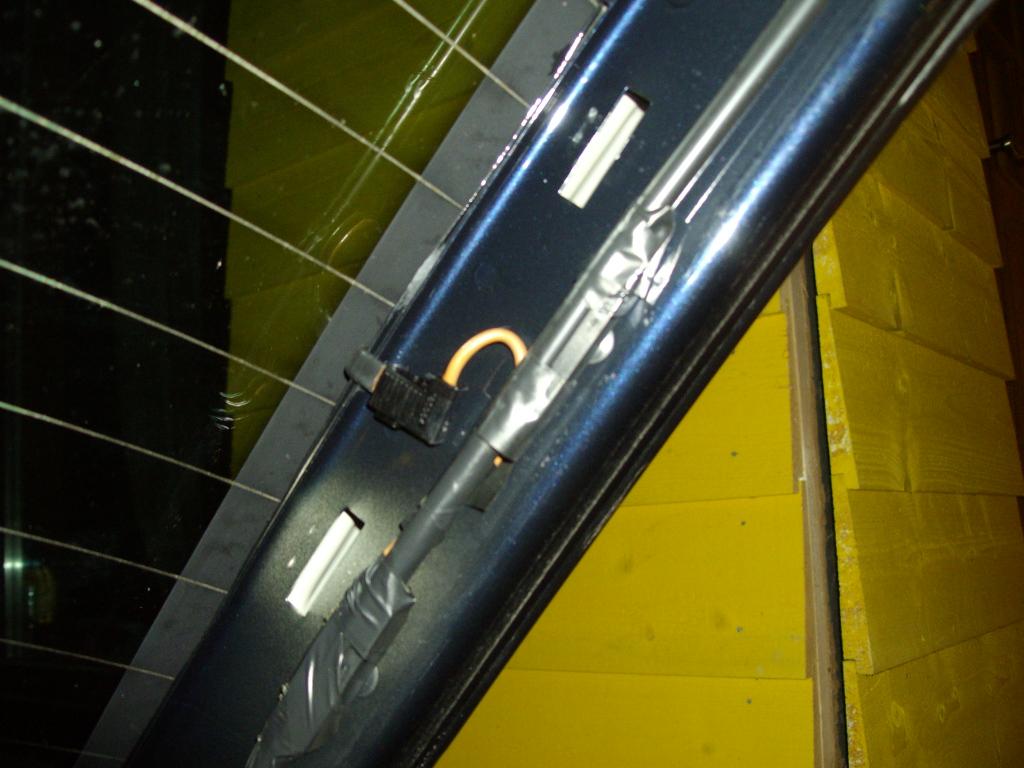
Luugi parempoolse inge sees on vaid 1 juhe tagaklaasisoojendusele ning tagakojamehe pesuvee voolik:
- 06-luukingparem1.JPG (111.1 KiB) Vaadatud 5480 korda
- 07-luukingparem2.JPG (86.31 KiB) Vaadatud 5480 korda
Saab 9-5 Estate 2.3t -->3.0t, 1999, overspeed
Postitatud: N Nov 07, 2013 14:05
Postitas overspeed
.
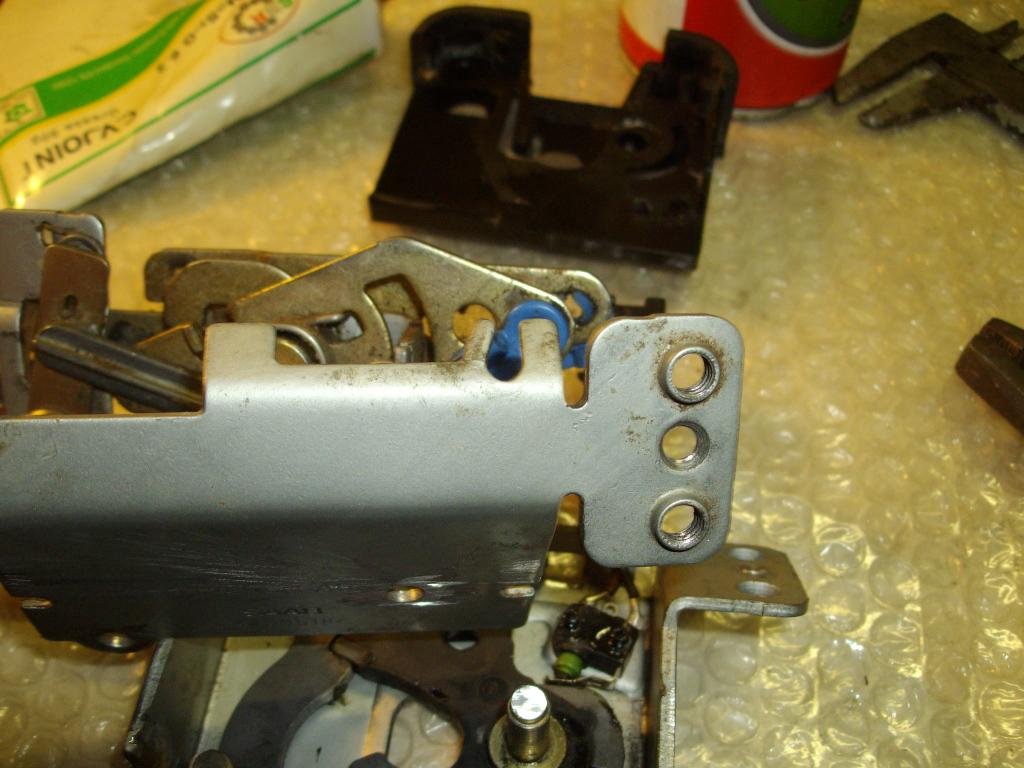
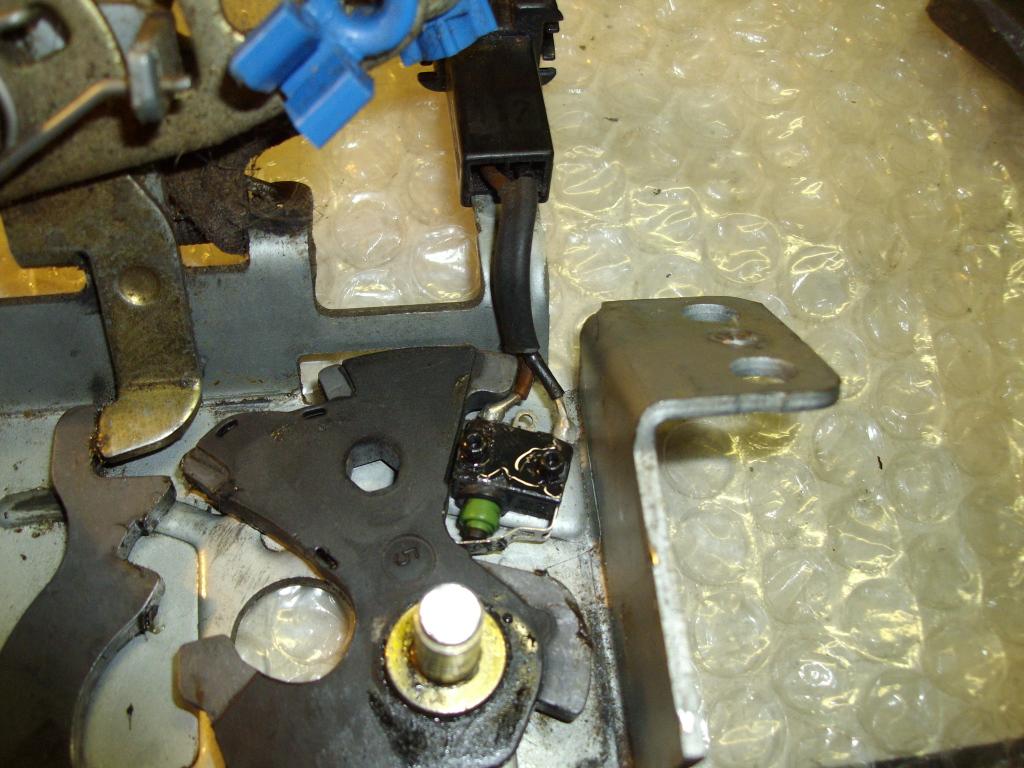
Lukult pistiku eemaldades kustus ka kohe pagaasnikuvalgustus ja indikatsioon armatuurpaneelil... järelikult viga mikrolülitis luku sees. Kiire kontroll, sillates pistiku otsad juhtmega, kinnitas seda:
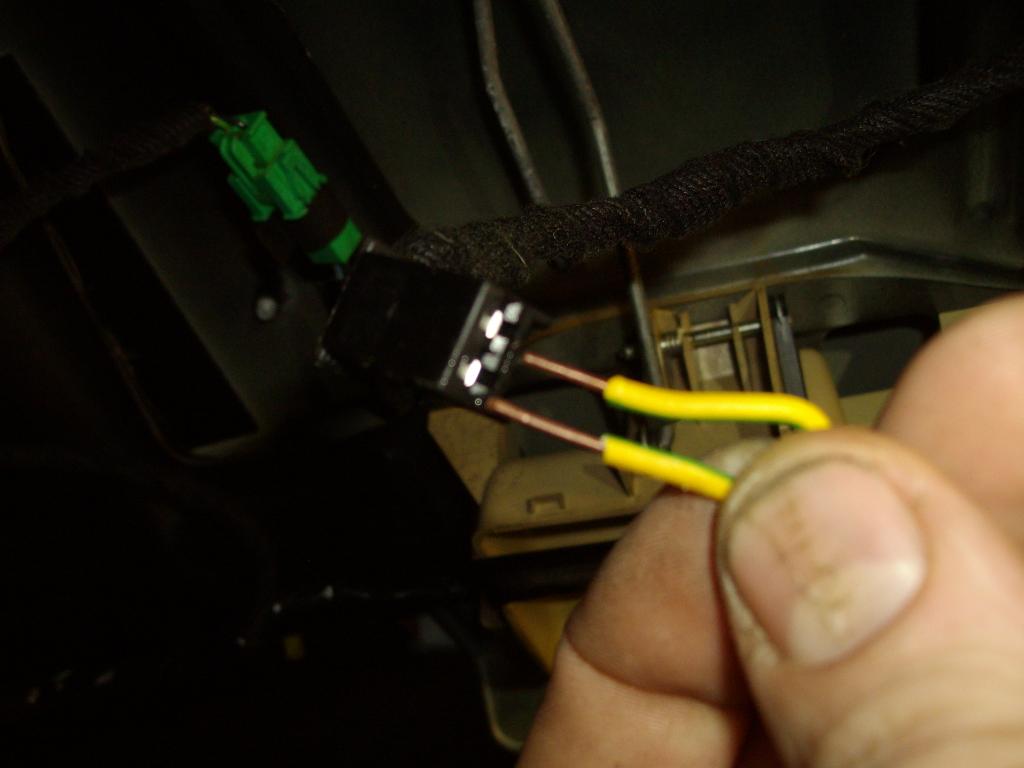
- 08-pistik.JPG (51.44 KiB) Vaadatud 5480 korda
- 09-pistik.JPG (100.76 KiB) Vaadatud 5480 korda
Saab 9-5 Estate 2.3t -->3.0t, 1999, overspeed
Postitatud: N Nov 07, 2013 14:12
Postitas overspeed
Saab 9-5 Estate 2.3t -->3.0t, 1999, overspeed
Postitatud: N Nov 07, 2013 14:15
Postitas overspeed
Saab 9-5 Estate 2.3t -->3.0t, 1999, overspeed
Postitatud: N Nov 07, 2013 14:22
Postitas overspeed
Saab 9-5 Estate 2.3t -->3.0t, 1999, overspeed
Postitatud: N Nov 07, 2013 14:30
Postitas overspeed
Saab 9-5 Estate 2.3t -->3.0t, 1999, overspeed
Postitatud: N Nov 07, 2013 14:36
Postitas overspeed
'
Lüliti ise-enesest oli terve, kuid katki oli teda ümbritsev korpus, pragu sees ning lüliti natukse paigast nihkunud. Tolle lüliti korpuse parandasin kiirliimiga.
Pöhjus, miks ta katki läks, paistab olema liialt kövasti luugi kinni löömisest. Seal on küll läbilöömiskummipuks, mis selle löögi vastu vötab (peaks ka natukse luugi äärepiirajaid väljapoole siis timmima), kuid kui sellest enam ei piisa liigub riiv vasta korpuse metalli, mis juhtme ees on ja olnud selle köveraks löönud pressis lülitit juhtmetest mis omakorda murdis lüliti korpusele prao sisse:
Peale kokkupanemist toimib taas nagu peab.

- 27-kinni1.JPG (105.16 KiB) Vaadatud 5478 korda
Nii on norm asend kinnises olekus:

- 28-kinni2.JPG (79.04 KiB) Vaadatud 5478 korda
Köveraks löödud metall:
- 29-kinni3.JPG (94.15 KiB) Vaadatud 5478 korda
Nii liigub ta juhtmete vasta kui läbilöögipuks enam ei jaksa:
- 30-kinni4.JPG (115.32 KiB) Vaadatud 5478 korda
Saab 9-5 Estate 2.3t -->3.0t, 1999, overspeed
Postitatud: N Nov 07, 2013 14:40
Postitas overspeed
'
Lisapiduritulel on esimesel nelja led-il miskit väikest must vidin maha kärssanud (ei tea täpselt kuidas seda nimetatakse, sest pole elektroonik). Jootsin möödaviigu esimesest neljast ledist ning nüüd pöleb vähemasti 3/4 tulest ... ja alarmi enam ei anna paneeli:
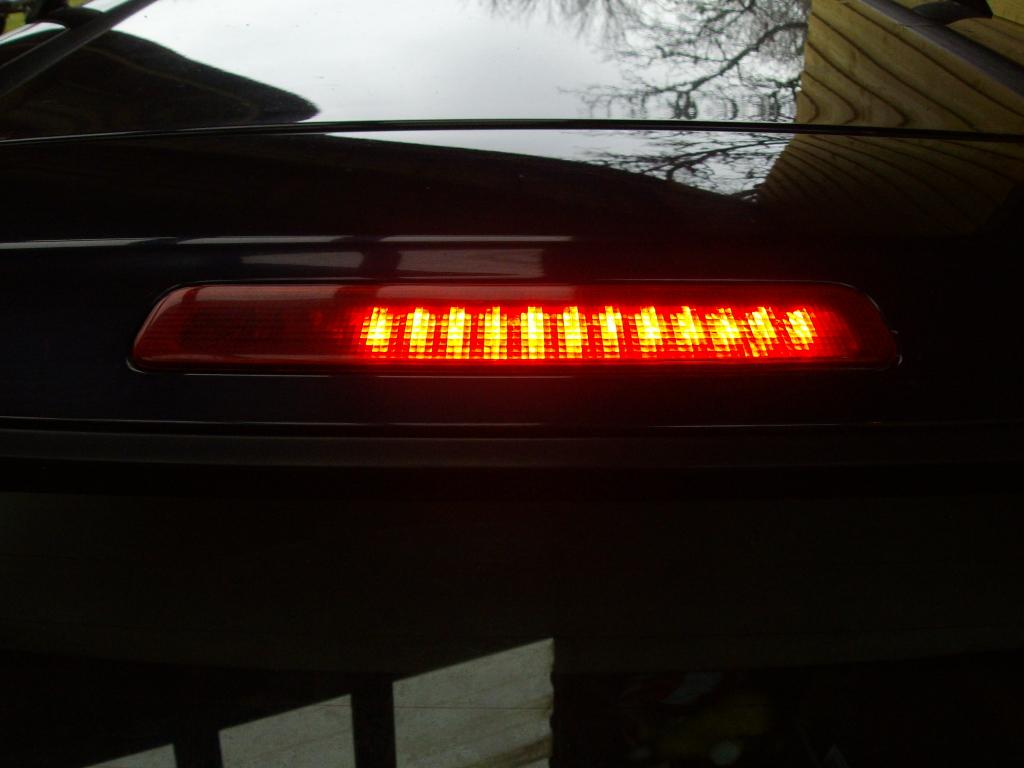
- pidur.JPG (61.41 KiB) Vaadatud 5478 korda
Saab 9-5 Estate 2.3t -->3.0t, 1999, overspeed
Postitatud: L Dets 28, 2013 18:55
Postitas overspeed
'
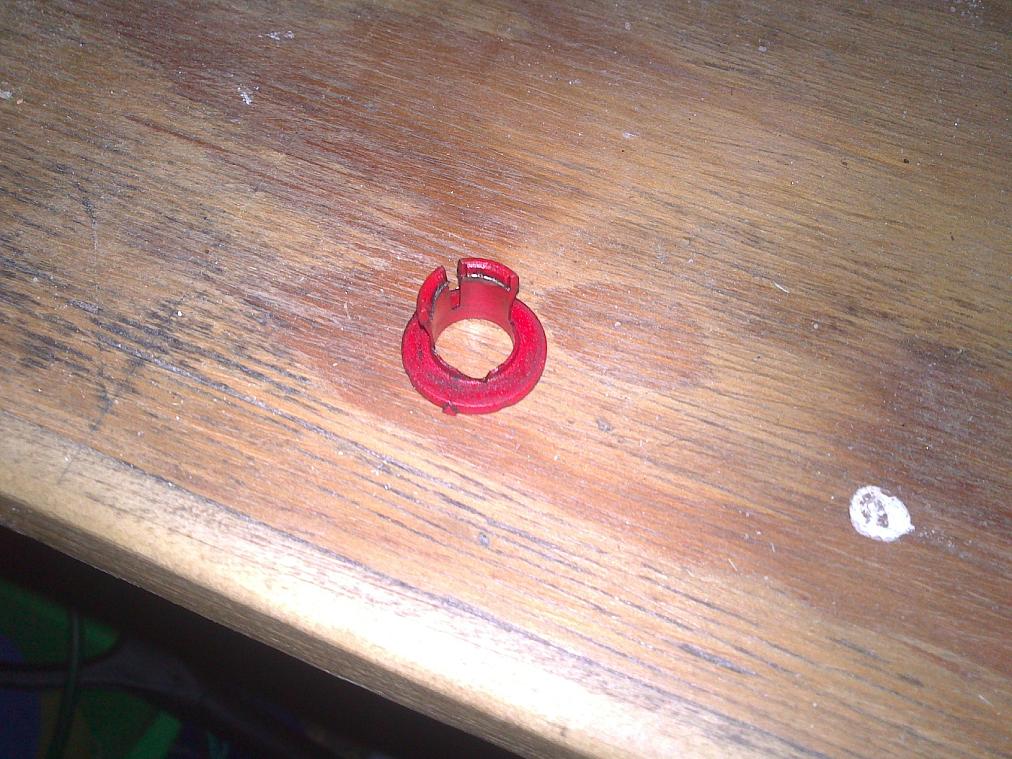
Vahepeal sai piduri vaakumvöimendi vahetatud. Andis teine ootamatult otsad ning tekitas pisut ohtliku olukorra autokasutajale.
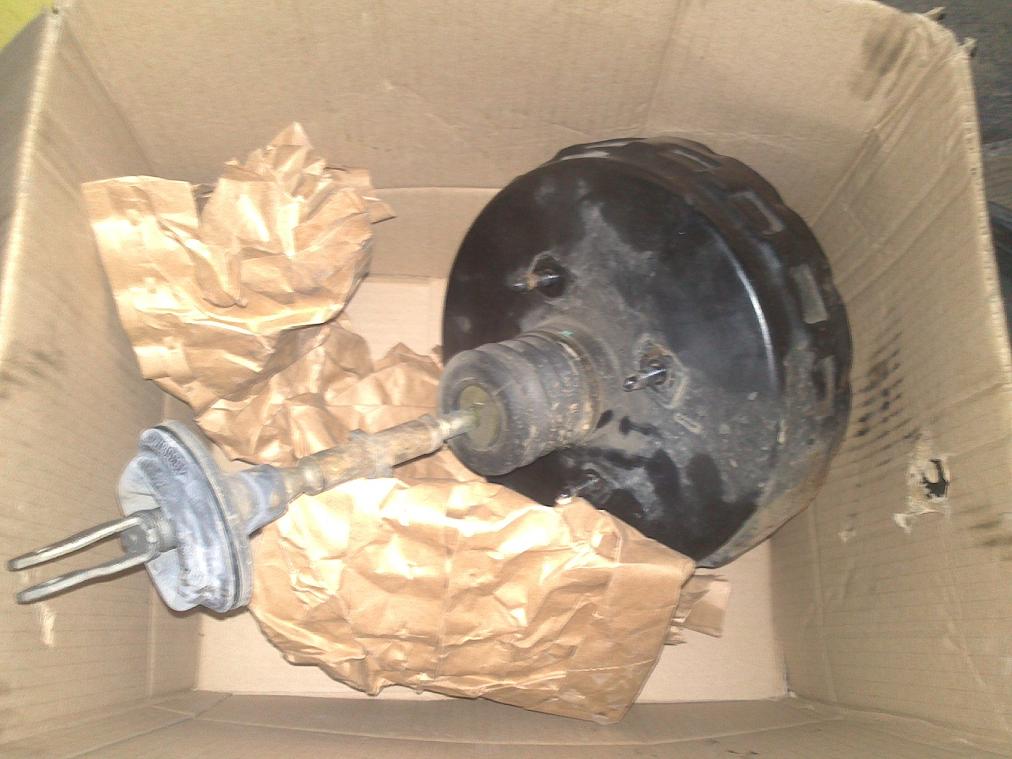
- 02-saab-vvoimendi.jpg (97.16 KiB) Vaadatud 5475 korda
Vaakumvooliku kinnitusel oli üks klamber ka katki.
Önneks leidsin vanal vahetatud mootori küljest terve.
- 01-saab-klamber.JPG (151.12 KiB) Vaadatud 5475 korda
Saab 9-5 Estate 2.3t -->3.0t, 1999, overspeed
Postitatud: E Veebr 17, 2014 21:36
Postitas overspeed
Tehtud see:
Kütuse filter / filtri vahetus , Bensiin i mootor 9-5
ja kuna 8000 km taas läbitud, siis mootoriöli ka uus.
ls 211'444 km
Saab 9-5 Estate 2.3t -->3.0t, 1999, overspeed
Postitatud: T Apr 22, 2014 2:12
Postitas overspeed
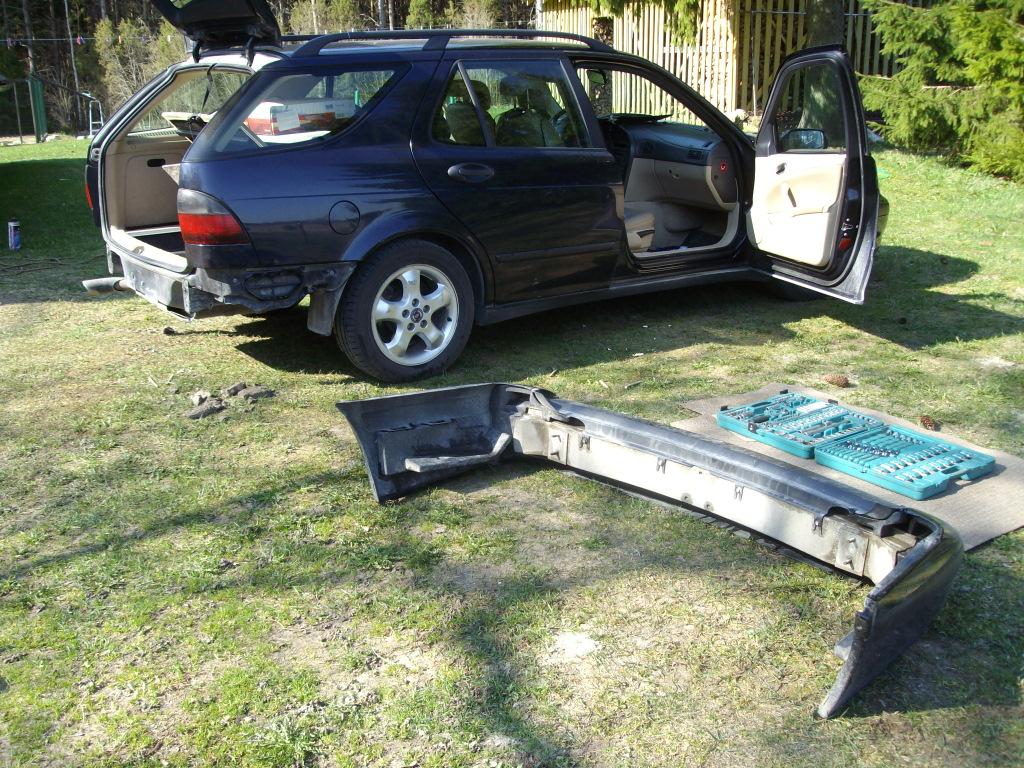
Nokitsen natukse lisa-varustuse kallal: puhastus, värv ... haagise konksu mul vaja läheb. Romulast saadud originaal anti kenasti köikide vajalike poltide ja juhtmetega (isegit korpuse läbiviigu kummiääris pandi kaasa). Just plug and play.
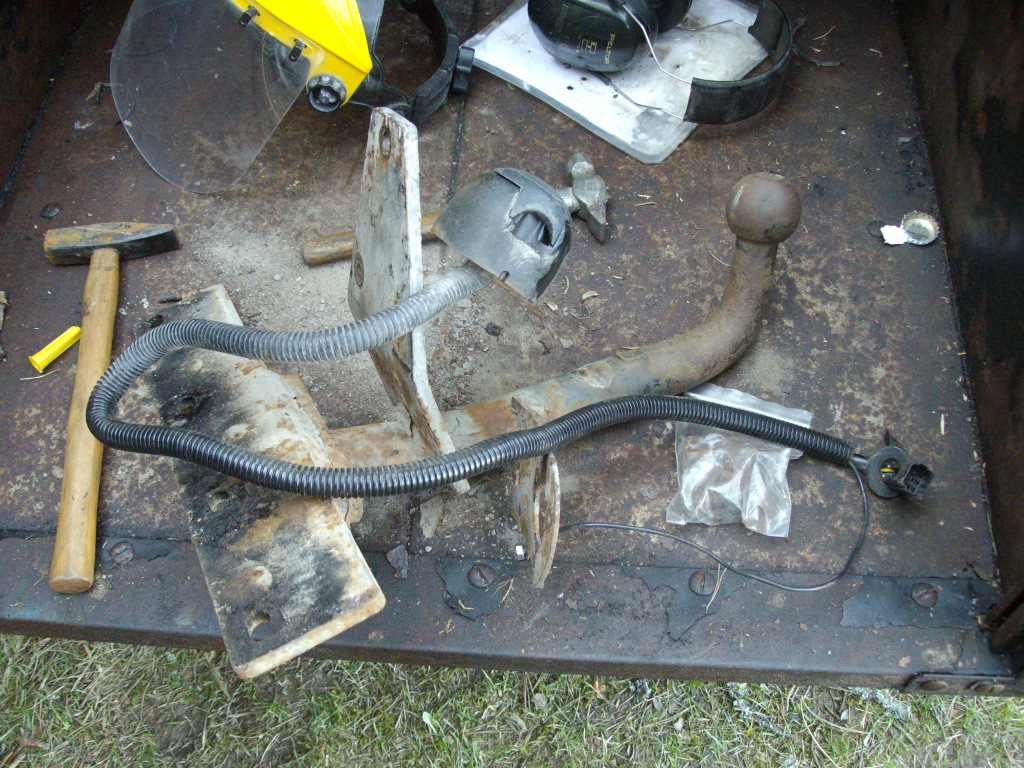
- konks-01.JPG (445.26 KiB) Vaadatud 5474 korda

- konks-02.JPG (481.84 KiB) Vaadatud 5474 korda
Saab 9-5 Estate 2.3t -->3.0t, 1999, overspeed
Postitatud: T Apr 22, 2014 22:23
Postitas overspeed
'
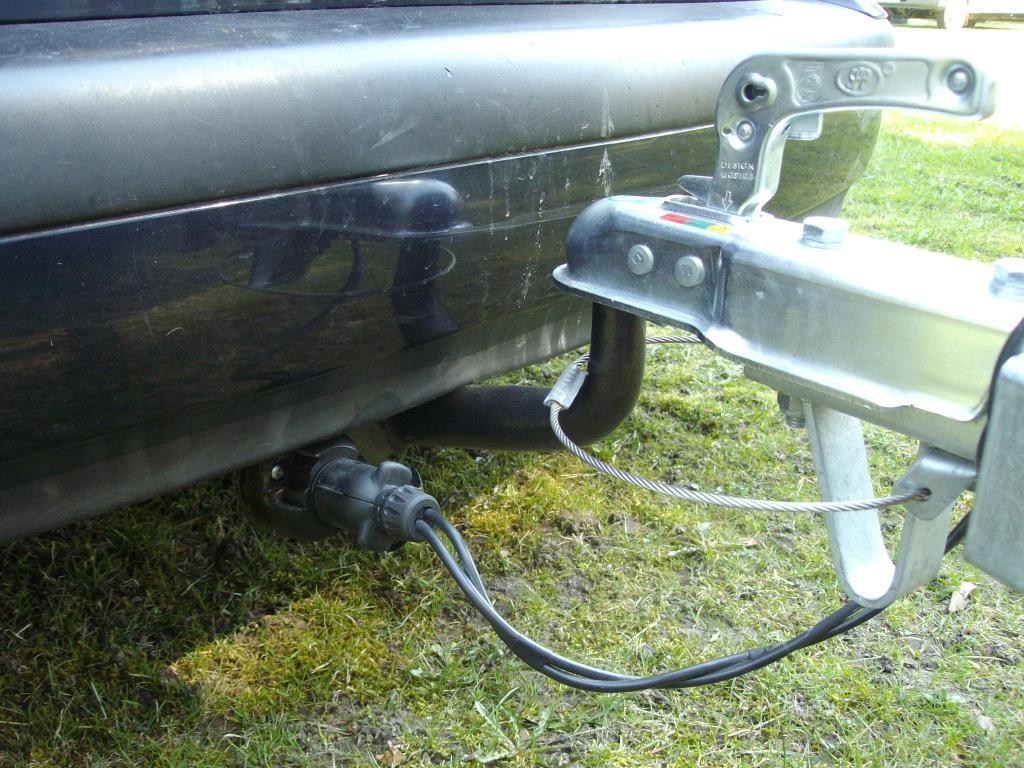
Töö käib, keermed keerme-puuri ja keerme-löikajaga puhtaks, määre vahele, hiljem korrosioonitörje öli poltide peadele, jne. Vöibolla vaja kunagi taas alt ää keerata.
Et haagise konksu paigaldada, tuleb tagastange eemale tömmata, ei mahu pikad poldid muidu sisse algul. Kuna mul kedagit stanget hoidma jätta polnud, oli see lihtsam üksinda tervenist küljest vötta.
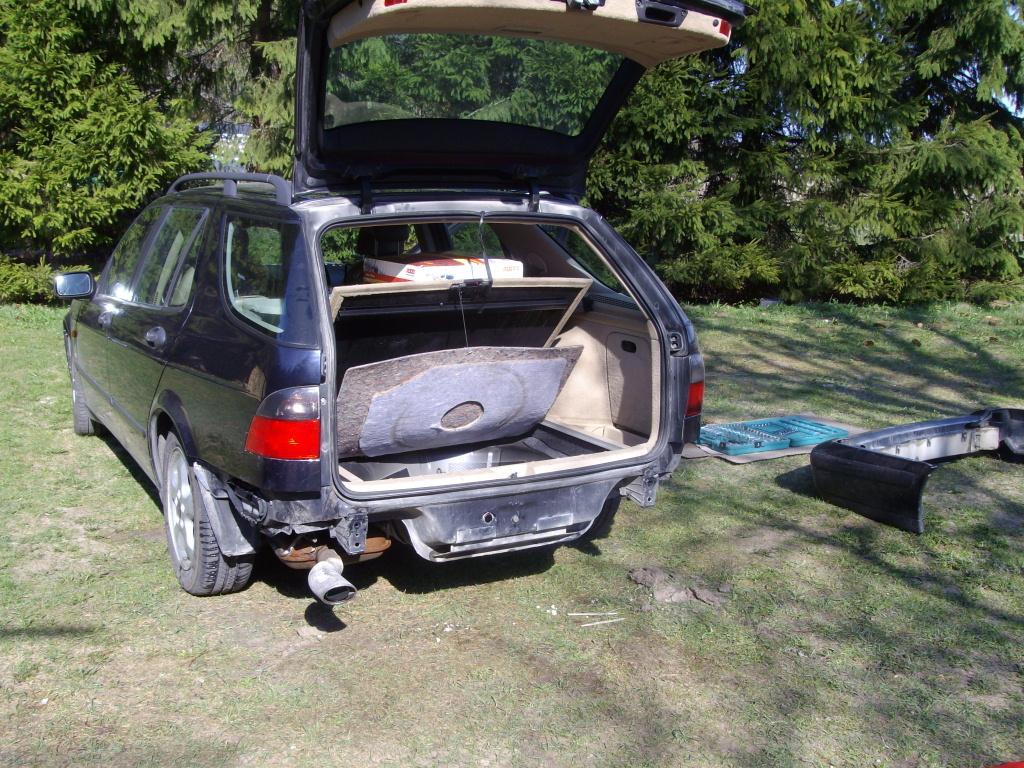
- konks-03.JPG (194.4 KiB) Vaadatud 5472 korda
- konks-04.JPG (218.58 KiB) Vaadatud 5472 korda
Saab 9-5 Estate 2.3t -->3.0t, 1999, overspeed
Postitatud: T Apr 22, 2014 22:25
Postitas overspeed
'
Haagise konks paikas, vedu vöib alata:
- konks-05.JPG (154.87 KiB) Vaadatud 5472 korda
Saab 9-5 Estate 2.3t -->3.0t, 1999, overspeed
Postitatud: T Apr 22, 2014 22:28
Postitas overspeed
'
Kasvab poeg, kasvab ka koorem mis vajab vedamist:
2011:
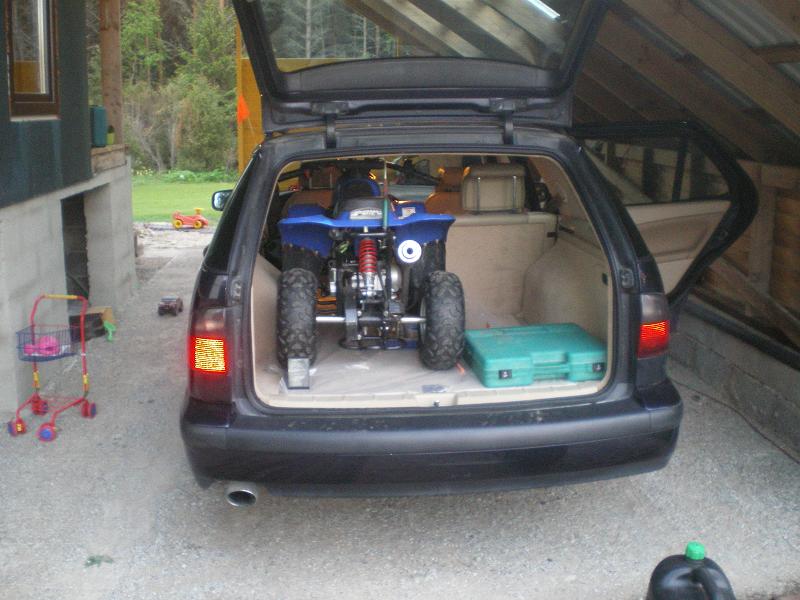
- 01-atvsaabis.jpg (76.88 KiB) Vaadatud 5471 korda
--- 2014:
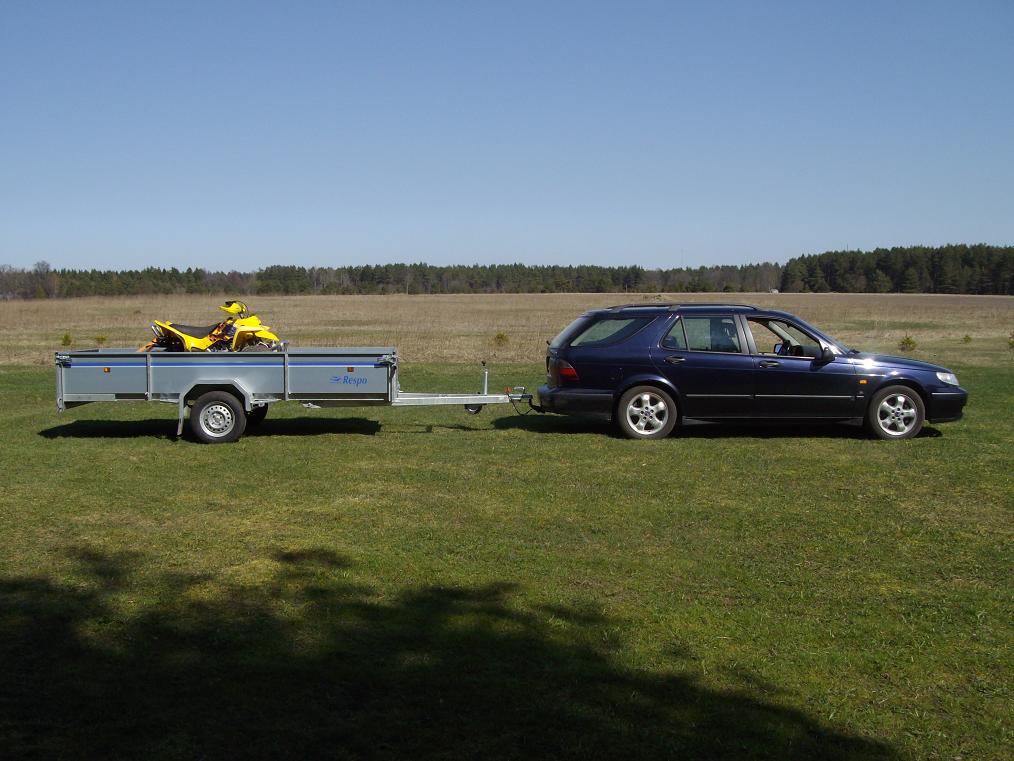
- 02-konks-06.JPG (107.21 KiB) Vaadatud 5471 korda
Saab 9-5 Estate 2.3t -->3.0t, 1999, overspeed
Postitatud: T Mai 27, 2014 23:09
Postitas overspeed
Autol kadus jöud. Armatuuril ükski alarmtuli ei pöle. Vaevu venitab 90 km/h kiiruseni ning sellest üle mitte. Mootor, turbo ja k.kast tunduvad nagu mehhaaniliselt öieti töötama.
Oskab keegi nöu anda, mida viga otsida ?
Saab 9-5 Estate 2.3t -->3.0t, 1999, overspeed
Postitatud: K Mai 28, 2014 19:29
Postitas skyline
Kas käivitushetkel ikka check engine jmt tuled korraks süttivad ehk neid pole keegi varasemalt "pimedaks" teinud? Kuidagi kahtlane kui ilma ühegi veateateta ei jõua enam minna.
Pidurid ei jookse peal?

Saab 9-5 Estate 2.3t -->3.0t, 1999, overspeed
Postitatud: K Mai 28, 2014 22:43
Postitas overspeed
Kas käivitushetkel ikka check engine jmt tuled korraks süttivad ehk neid pole keegi varasemalt "pimedaks" teinud? Kuidagi kahtlane kui ilma ühegi veateateta ei jõua enam minna.
Pidurid ei jookse peal?
Jah süttivad ehk ei ole "pimedad", pidurid ei jookse peale.
Saab 9-5 Estate 2.3t -->3.0t, 1999, overspeed
Postitatud: N Mai 29, 2014 12:04
Postitas overspeed
Mootor töötab tühikäigul hästi aga ei lähe pöördesse.
Kas pakun öieti, kui arvan et turbo ei anna öieti tööröhku. Mis oleks esmajärjekorras mida piiluma peaks ?
Saab 9-5 Estate 2.3t -->3.0t, 1999, overspeed
Postitatud: T Juun 10, 2014 19:33
Postitas overspeed
P0455: Fuel evaporation system major leak.
Ise ma muidugit asja juures ei olnud, töö töttu, kuid naine rääkis et mingi vooliku nad seal ära vahetasid. Masin söidab paremini küll kuid tunduks nagu natukse ikka veel uimane.
Kas on kellelgi miskit soovitust, mida seal traktis hoolet tahaks (möni klapp, solenoid?) ja kuidas see aurude süsteem täpsemalt töötab?
Saab 9-5 Estate 2.3t -->3.0t, 1999, overspeed
Postitatud: L Aug 09, 2014 19:12
Postitas overspeed
Minu röömuks jöudis kätte löpuks see päev, kus sain auto tuua Tallinna Audacer'i remonti. Uimasus tuli tagasi ja muud pääsu tegelt polnudki, sest Saaremaal seda viga ei leita.
Vahetatud sai palju vajalikke asju ning nüüd söidab masin taas.
Mootoritööd segas defektne väntvölli asendiandur, vahetati ECU, tagasilla puksid said köik uued ja ees- taga piduriklotsid.
Saab 9-5 Estate 2.3t -->3.0t, 1999, overspeed
Postitatud: E Okt 13, 2014 0:38
Postitas overspeed
Check Engine tuluke pöleb, lasin uurida -- lamda anduri soojendus ahel katki. Söitu ei sega.
Peale pikemat seismist ja külmema ilmaga
Check Gearbox pöleb, tunda on et kiirendus uimane. Peale pikemat söitmist kustub tuli ja tagasiside käigukastist on normaalne taas.
ACC test andis vea 21:
Direct current motor, air recirculation flap.
Kas vöib arvata miskit sellist ? :
Saab 9-5 HVAC Recirculation Air Motor Repair
Pretty much every early model year Saab 9-5 owner is going to have to deal with this one sooner or later. The lever actuating arm on the recirculation control motor snaps off because of dodgy design and improper material selection. This one is a candidate for the “Made by Monkeys” blog at the Design News web site. There are no symptoms except the A/C doesn’t work so well when first starting up a car that’s been s..ting in the sun for a while, as the recirc flap defaults to fresh air mode when the lever arm breaks off.

- 01-MotorBrokenArm.jpg (60.18 KiB) Vaadatud 5870 korda
The repair or replacement of this item is fairly easy, as repairs to Saab 9-5 HVAC systems go. Here is a quick outline of what has to be done:
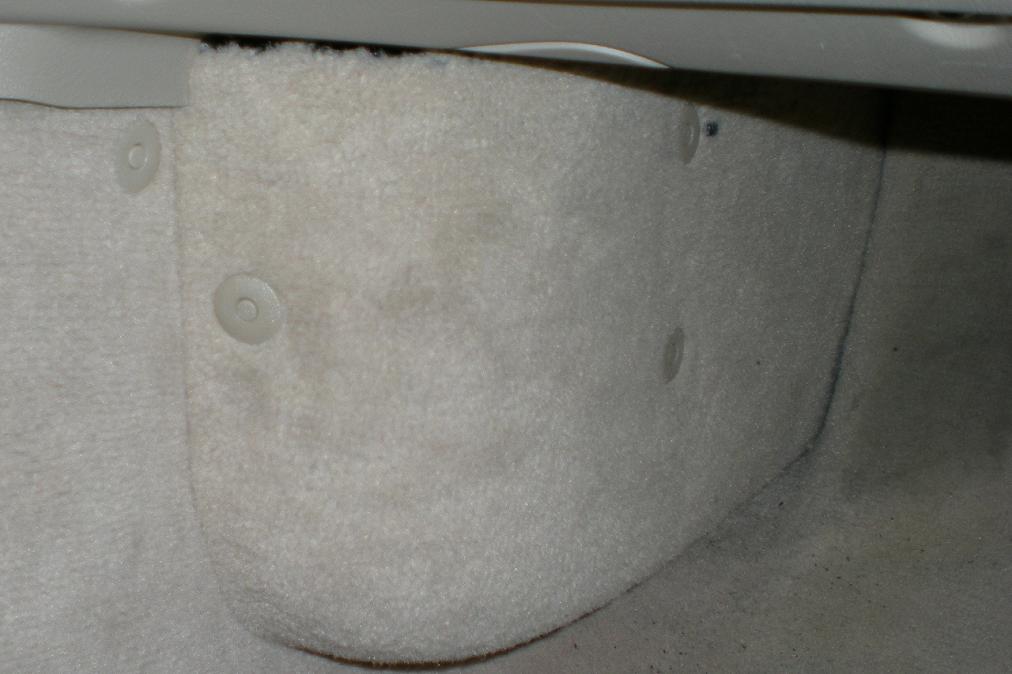
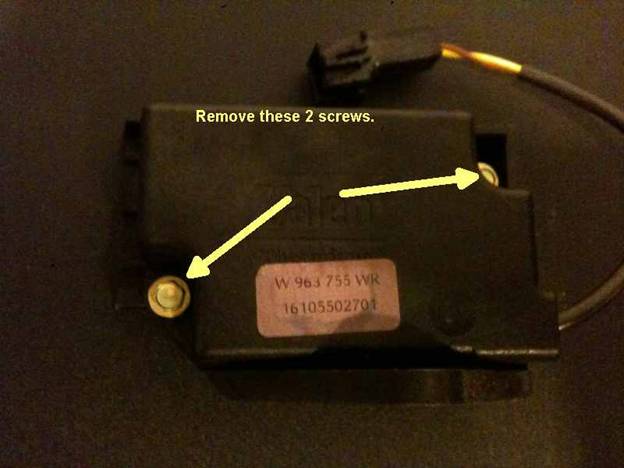
Remove passenger (LHD cars) footwell cover from left wall;
Remove under dash cover;
Remove glove compartment;
Remove recirculation motor (broken arm usually drops out when motor is removed);
Repair motor;
Replace motor and reassemble everything in reverse order.
For early (pre-2001) 9-5’s it’s possible that the motor could be non-operative due to a burned out resistor. If your ACC calibration failed with a code 21 this indicates a failed recirculator motor. Replacement may be your only option on the later cars as mine (MY2001) has the motor sonic welded together, there’s no practical way to disassemble it to replace the failed 18 ohm resistor that tends to happen on the early cars. It’s easy enough to test the motor on the bench with a 12V power supply. Apply voltage one way, then reverse the polarity to move the motor back in the other direction. You will need to do this in any case in order to move the shaft to a middle position if you effect the repair I listed below. A replacement actuator arm part (part number 4869426) can be found at www.gmpartsdepartment.com for about $USD20 last time I checked. Since this didn’t look like too much trouble to frig a repair, and the force needed to move the recirculation flap is pretty small, I decided to try a fix.
Detailed Repair Instructions
Remove passenger side footwell cover by removing 3 plastic anchor pins:
- 02-FootwellCover.jpg (75.23 KiB) Vaadatud 5870 korda
WARNING: don’t try to forcefully pull out the 3 clips! They come out really easy if you know the secret: use a small screwdriver and push in the center pin about 1/8″. It should click and stop. At that point the clip is released and should just pull right out. For reassembly, push the center pin out from the inside of the clip. Insert the clip and pin back into its hole, and depress the center pin flush in order to lock in the clip. (Sure wish we had these on the Saab 9000!) Remove the cover, and note the locating pin behind the upper plastic clip.
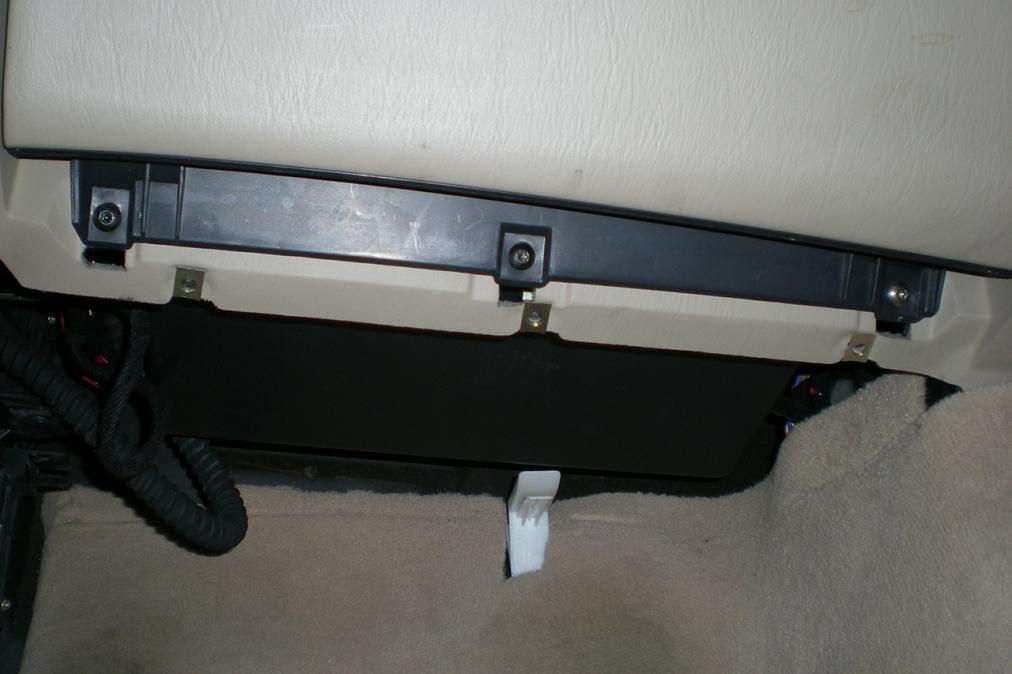
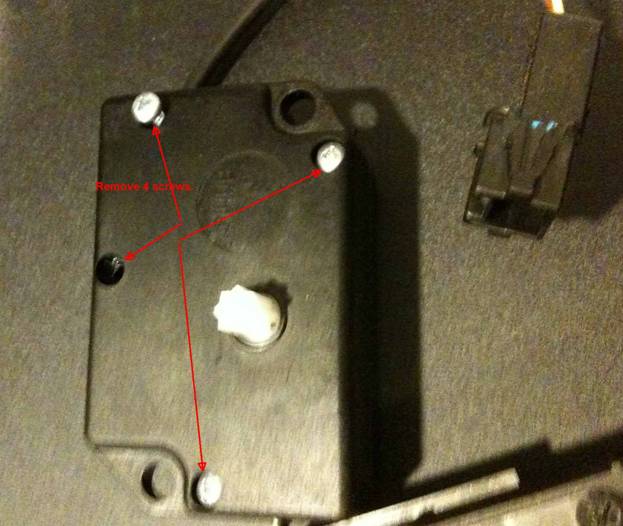
Remove under dash cover by removing 4 T25 screws as shown below:

- 03-DashPanel.jpg (62.32 KiB) Vaadatud 5870 korda
Remove the glove compartment by removing 3 screws at the bottom:
- 04-GloveBoxScrewsLower.jpg (71.74 KiB) Vaadatud 5870 korda
Then remove the three screws behind the door at the top:
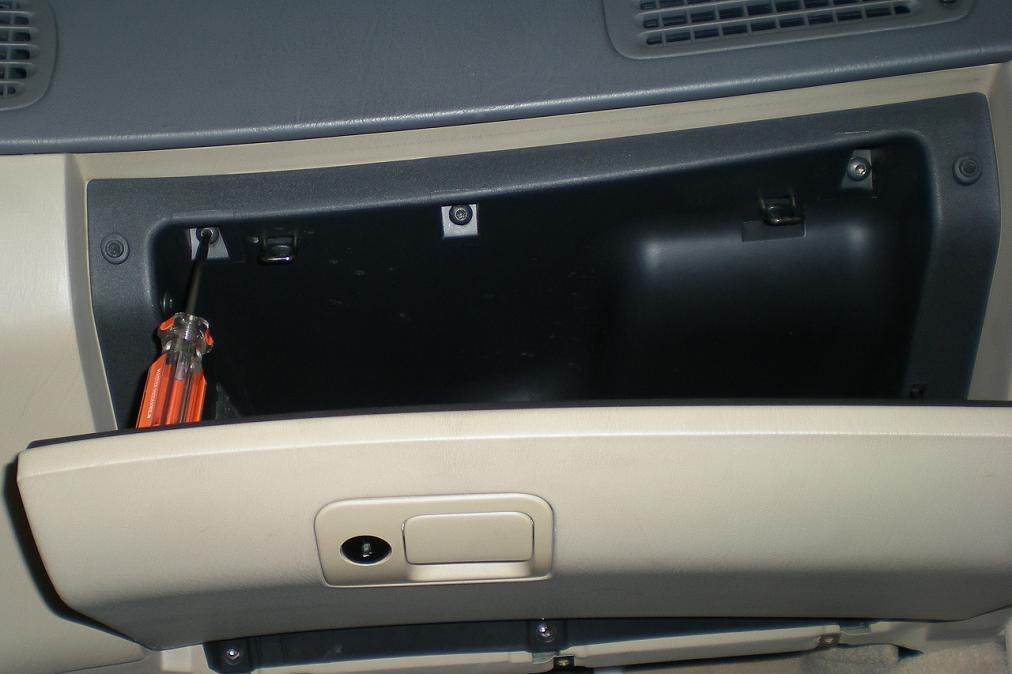
- 05-GloveBoxScrewsUpper.jpg (68.8 KiB) Vaadatud 5870 korda
Gently pull the glove compartment forward, and disconnect the two leads for the glove compartment light and the small hose for the cooling air. Remove the glove compartment from the car, and now you should have full access to the right side of the air box.
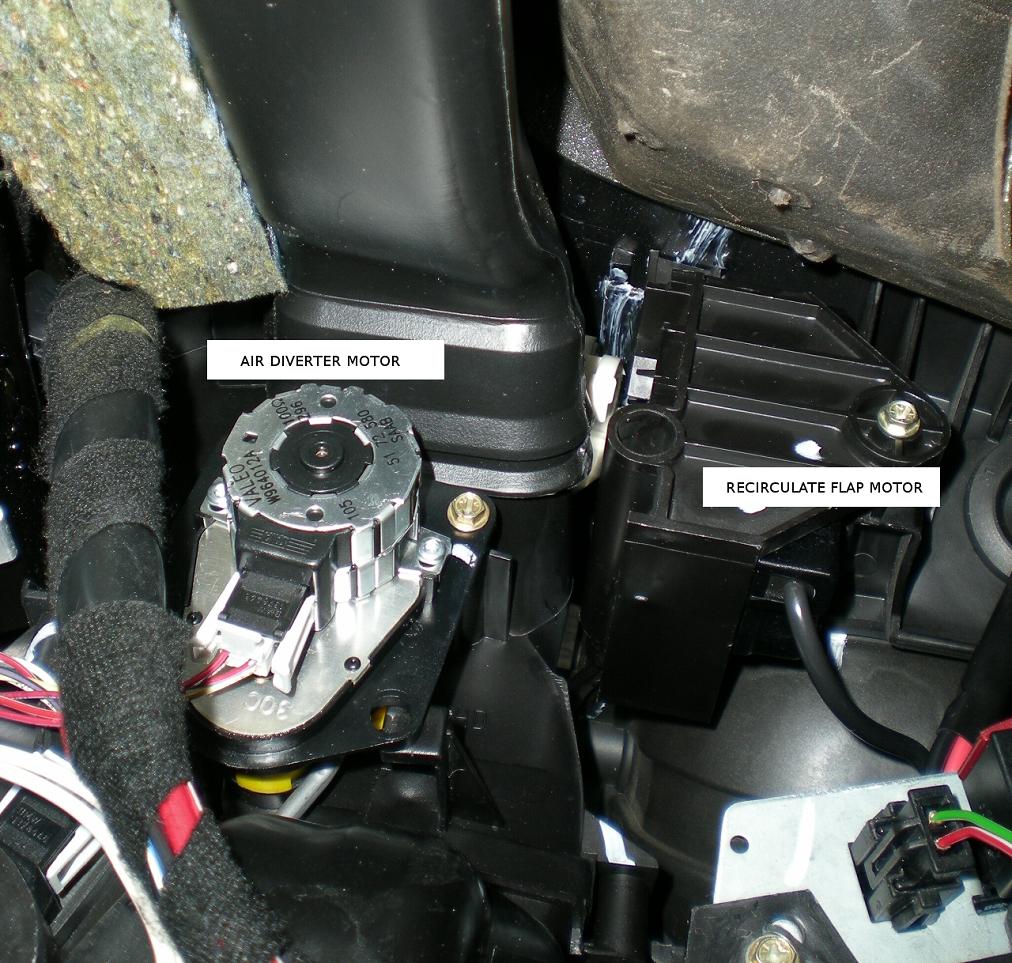
- 06-MotorLocation.jpg (184.79 KiB) Vaadatud 5870 korda
Disconnect the electrical connector for the recirculation motor, and remove the connector from the bracket. Remove the two 6mm/Philips screws holding the motor in (the left screw is deep inside the boss shown, use a #2 Philips on this one) and remove the motor. Replace the broken actuator arm and reassemble. Or, if you are cheap like me, repair the arm and then reassemble.
I made up a little piece of 0.025″ thick aluminum and epoxied it to the motor and broken shaft:

- 07-ArmReinforcement.jpg (192.79 KiB) Vaadatud 5870 korda
I used a clear epoxy. JB Weld would probably work as well. Shim the broken arm in place until the epoxy sets, then remove the bits while you still can to keep the epoxy from creating a mess by sticking to the shims, then be patient and let the epoxy fully harden. To ease reassembly, use the power supply to run the shaft to its full CCW position (this is the default position of the recirculator flap).
- 08-RepairedMotor1.jpg (77.26 KiB) Vaadatud 5870 korda
Seems the epoxy didn’t stick too well to the nylon material the arm is made out of. So rather than a chemical solution this time I took a mechanical approach. I had some miniature “Plastite” screws I’d used on a recent project so just used some of these, along with a little more metal bending, to secure the arm to the motor. McMaster-Carr has them. You’ll also need a T-5 Torx® driver and a 1.25mm drill bit to complete the work. So far with two road trips today in 90°+ weather everything is working fine. This is what the latest repair looks like:[/i]

- 09-RecircServo2.jpg (103.88 KiB) Vaadatud 5870 korda
Saab 9-5 Estate 2.3t -->3.0t, 1999, overspeed
Postitatud: T Okt 14, 2014 14:34
Postitas overspeed
Saab 9-5 Estate 2.3t -->3.0t, 1999, overspeed
Postitatud: T Okt 14, 2014 15:03
Postitas Vant
Remontisin nädalavahetusel seda sama jublakat, samast kohast oli pooleks ka

Tegid ise korda või tellisid uue (mina parandasin edukalt plekitüki ja neetidega)?
Saab 9-5 Estate 2.3t -->3.0t, 1999, overspeed
Postitatud: K Okt 15, 2014 2:23
Postitas overspeed
Remontisin nädalavahetusel seda sama jublakat, samast kohast oli pooleks ka
Tegid ise korda või tellisid uue (mina parandasin edukalt plekitüki ja neetidega)?
Olgugit, et köike on küll saada:
Originaal hoob
Asendus hoob
Parandus komplekt
Hooba parandada ise pole probleem.
Kahjuks ei tööta ka sellel mootor mul. Too 18 Ohm resistor on pölend, tuleb uus panna:
Juhend servo sisust
Mul see ülemine plastvöru, millest ülaltoodud lingis ka räägitakse, samuti ää sulanud mootori ülemäärasest ketramisest seoses murdunud hoovaga.
Homme poest uus resistor ja siis tagasi kokku.
- ACCRS010.jpg (101.2 KiB) Vaadatud 5910 korda
- ACCRS011.jpg (142 KiB) Vaadatud 5910 korda

- ACCRS012.jpg (114.98 KiB) Vaadatud 5910 korda
- ACCRS013.jpg (128.23 KiB) Vaadatud 5910 korda
- ACCRS014.jpg (93.1 KiB) Vaadatud 5910 korda
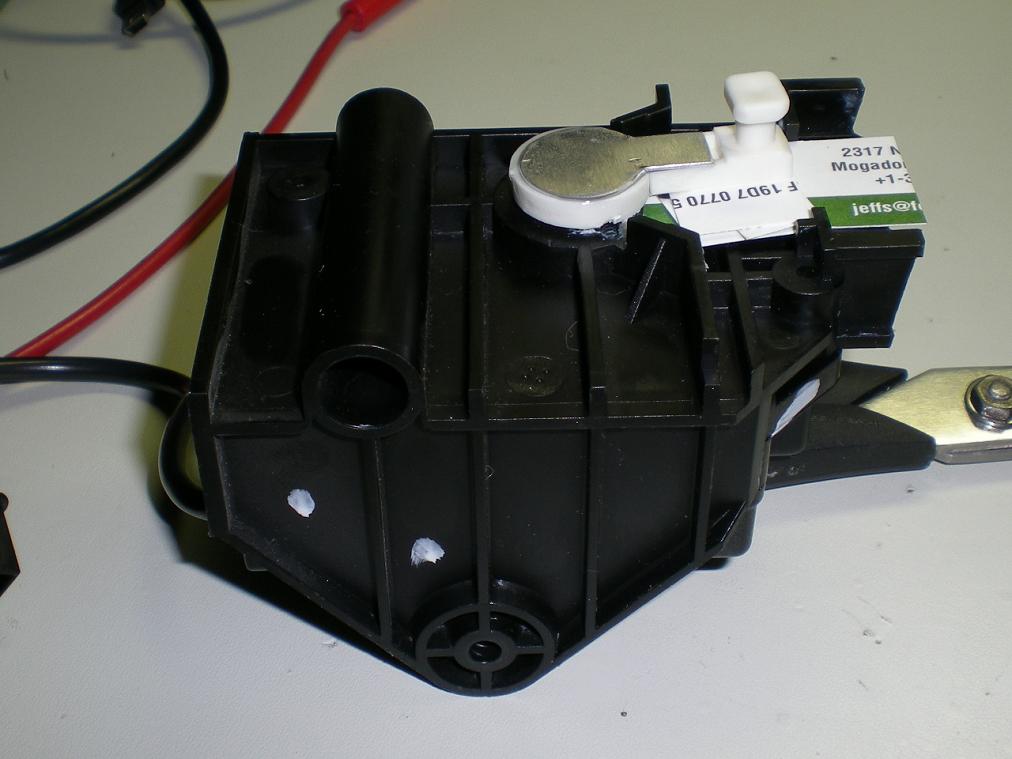
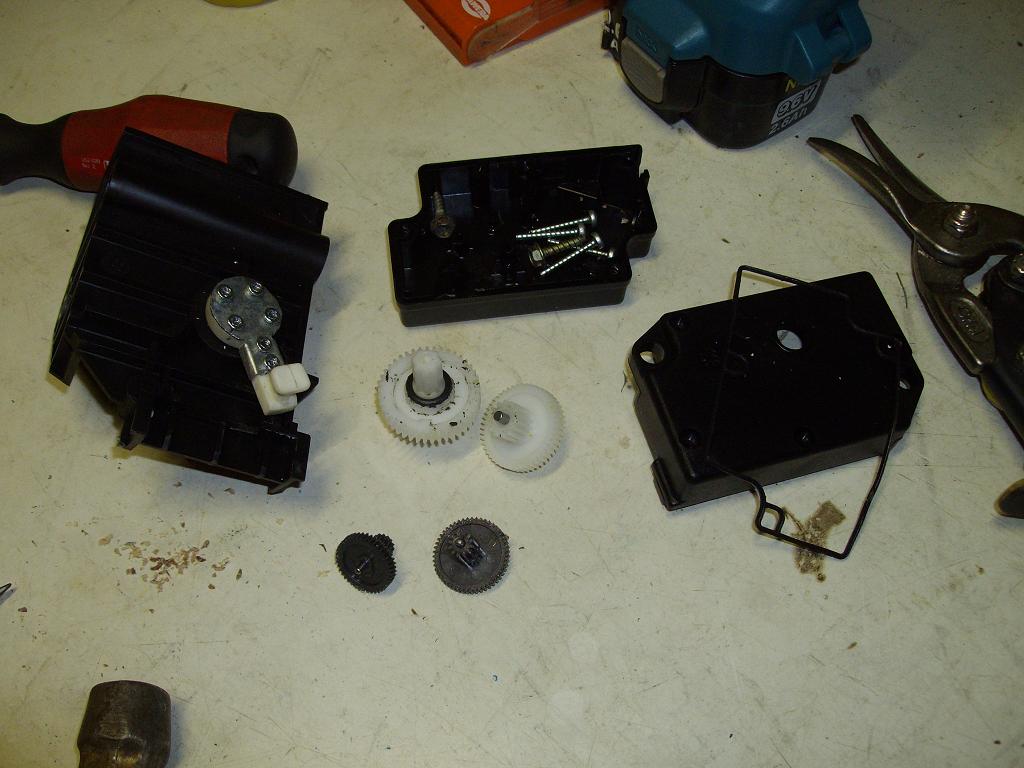
9-5 Climate Control air recirculation servo repair using SKANDIX kit 1030209
The recirculation function in a climate control system dramatically increases performance in extreme conditions. In hot, humid environments duct temperatures can be 10° F lower when in recirculate mode. This is because as much as 50% of the cooling energy is being used to condense water in the air. In recirculate mode, the air inside the car is quickly dehumidified and cooling performance increases. The ACC system can be programmed (using a Tech 2) to remain in recirculate mode below speeds of 30kmh. Default programming is for speeds below 10kmh, but improved cooling performance can be realized with the higher setting. It stands to reason that initial cabin heating performance will be better in recirculate mode as well.
Recirculate motor failures are quite common on the 9-5 but they are under diagnosed because no code is set unless the motor has failed in an open circuit condition. This failure would result in a code 21, due to a completely burned up dropping resistor. If only the link arm or internal gears are broken, a code will not be present.
The easiest way to check recirculation door operation is to watch the door on the left side above the accelerator pedal, while an assistant cycles the recirculate switch.
Removal instructions can be found here: http://www.scribd.com/doc/221791/Recirc ... or-Saab-95
SAAB 5334719 includes link arm (SAAB 4869426) and mounting bracket. SAAB 5045711 is the servo motor only. This kit is an economical solution to the failure of either part number, saving over $150.00. Labor time for the repair, once the servo is removed from the car, is not more than 20 minutes.
- image001.jpg (28.7 KiB) Vaadatud 5910 korda
Remove the 4 screws shown, and lift off the cover.
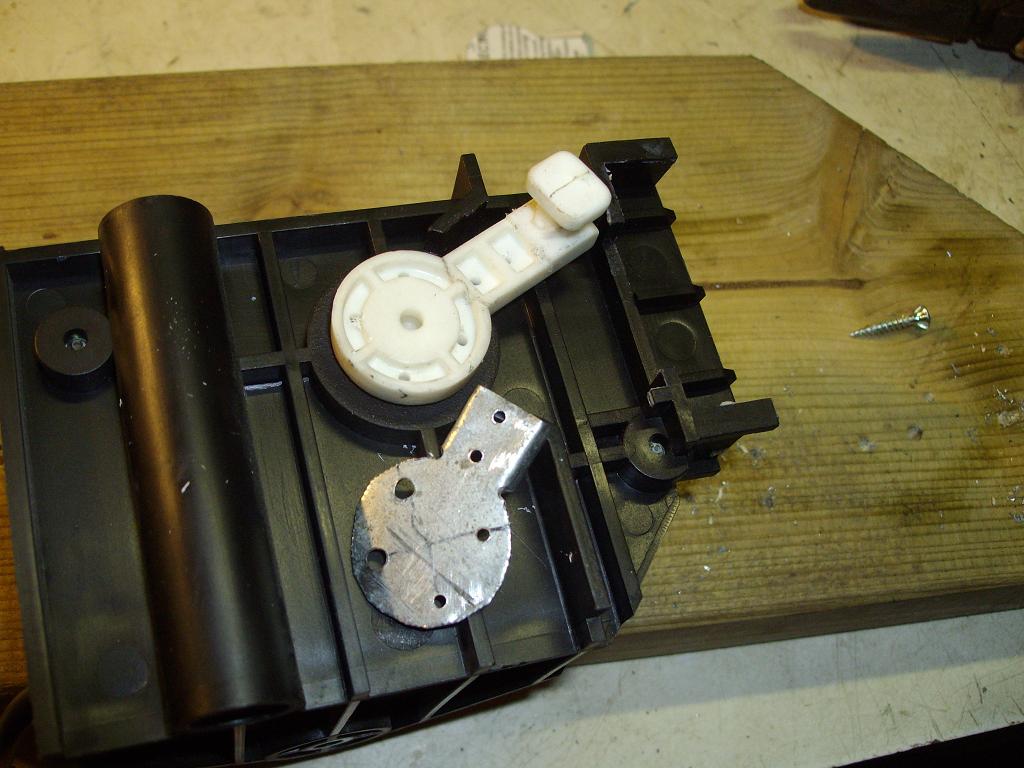
- image002.jpg (44.51 KiB) Vaadatud 5910 korda
The white gears are included in a rebuild kit available from www.skandix.de and www.saabservices.com as part number 1030209. The kit also includes the link arm or lever 4869426.
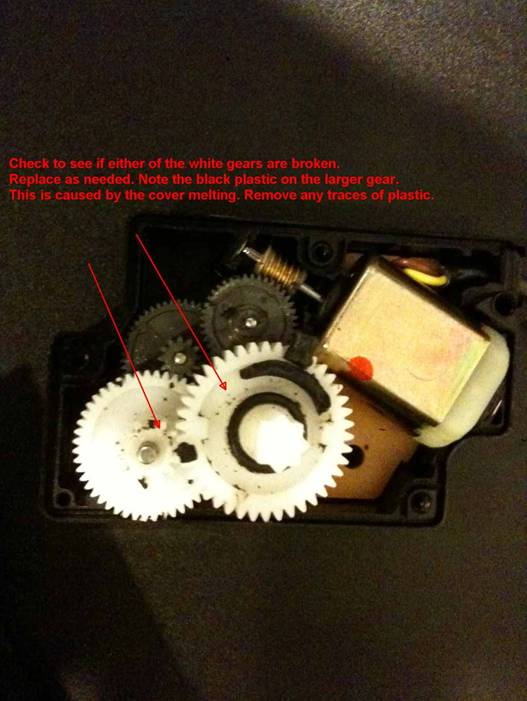
- image003.jpg (46.45 KiB) Vaadatud 5910 korda
This type of damage is not very common, and as long as the gear turns freely against this surface after cleaning the area it is fine. Use a small amount of lithium grease here if you like.
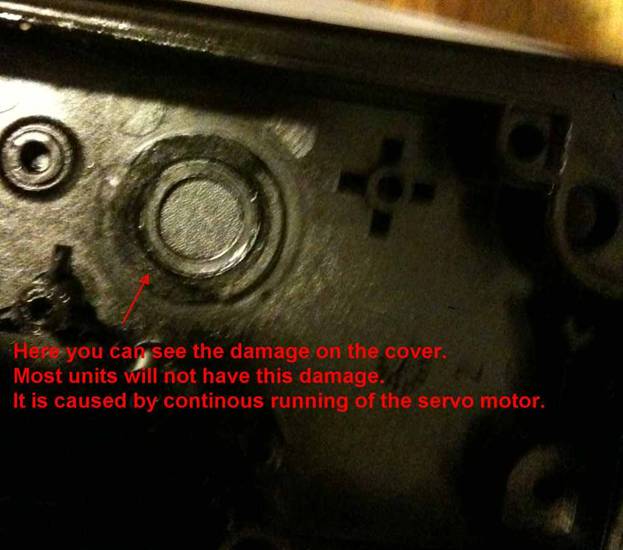
- image004.jpg (39.72 KiB) Vaadatud 5910 korda
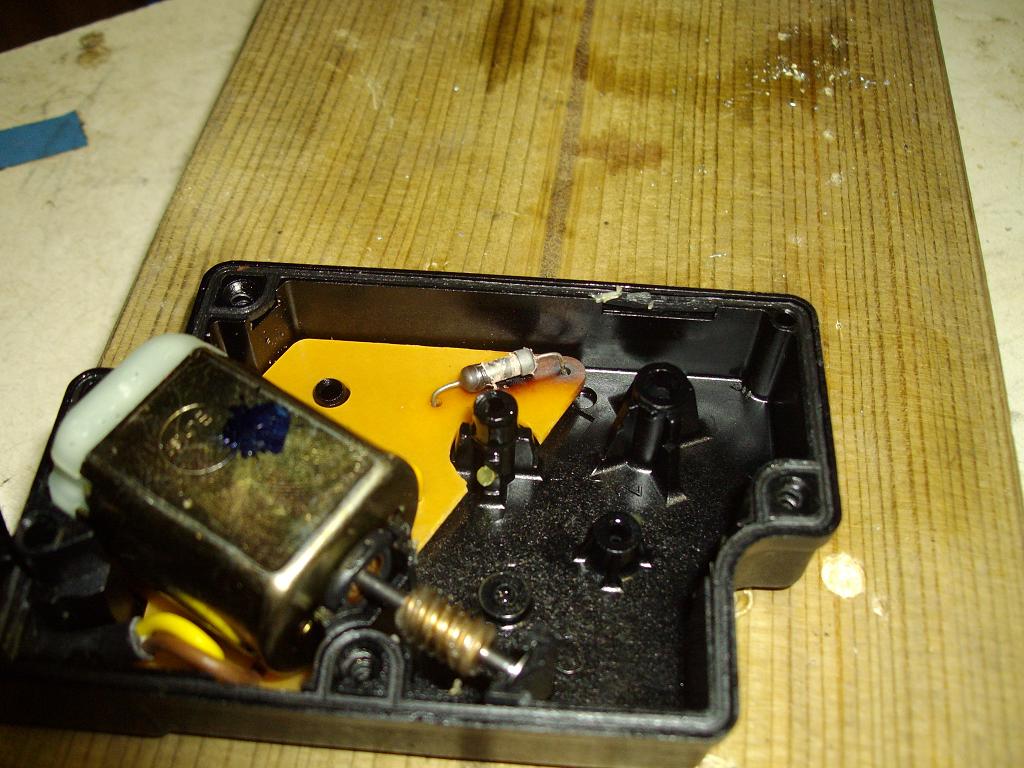
On occasion this resistor will be damaged. The resistor reduces the voltage to the motor, and it is required because in this application there is constant power applied to the motor.
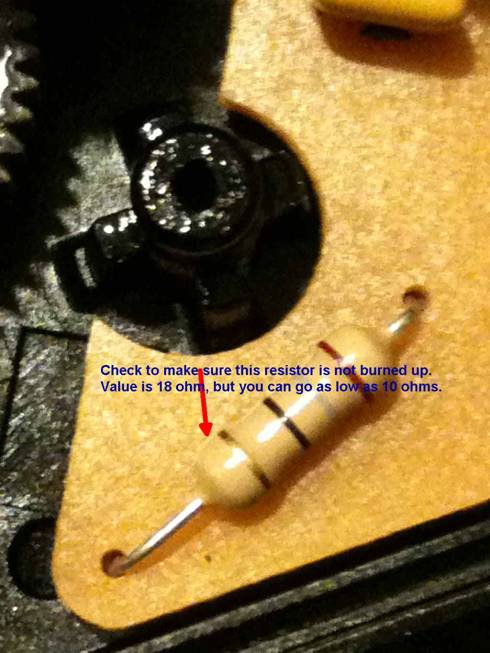
- image005.jpg (48.44 KiB) Vaadatud 5910 korda
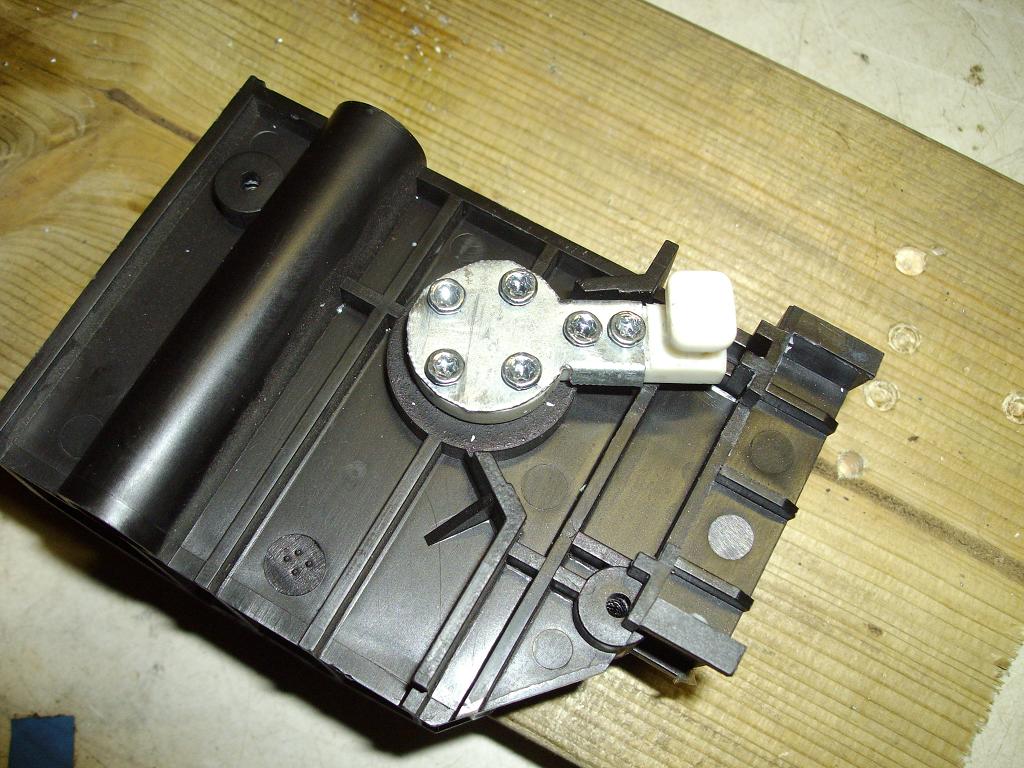
Align the large gear with the flat edge as shown, and reinstall the cover and 4 screws.
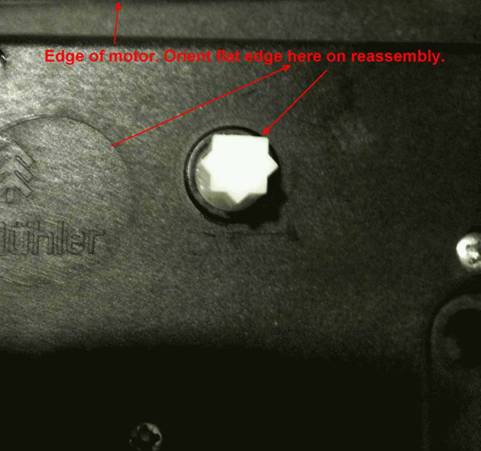
- image006.jpg (23.89 KiB) Vaadatud 5910 korda
Assemble the servo motor to the mounting bracket and install the 2 screws. The motor operates from 12 volts DC and is easily tested using jumper wires prior to installation.
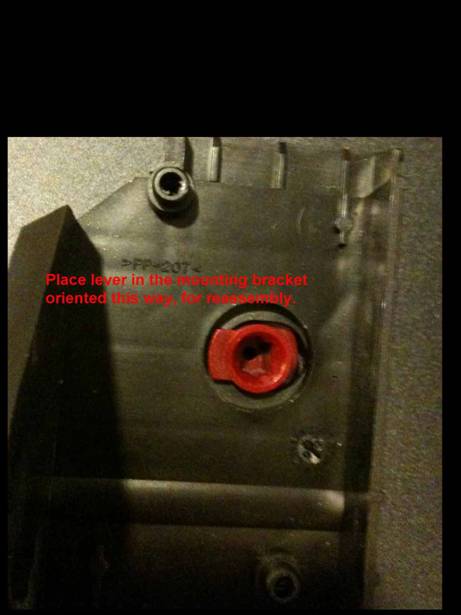
- image007.jpg (26.09 KiB) Vaadatud 5910 korda